Constructing The Worm Bin
The next small project on the list was the worm bin, or "worm castle" as I have now decided to call it. Worms are extremely efficient at converting food waste into a nutrient rich, plant available soil medium. This worm poo, commonly referred to as worm castings or black gold is literally worth its weight in gold. To buy good quality castings, you're going to pay a lot for it. You don't get rich writing cheques so I decided to build my own worm castle so I can have an endless supply of castings for my garden.
The first step was to source an old bathtub. Thankfully, the previous owners had a horse in the paddock and left the tub they were using as a water trough. It's cast iron and weighs a tonne. I hooked a rope through the pug hole and tied it to the tow bar of the ute, then dragged it a good 100 meters through the paddock. Just as I pulled up beside the backyard, the rope snapped, so i re-tied it and hooked it around me like a horse pulling a plough. I dragged it down beside the house then attempted to push it back up under in position. The missus was laughing as all 110kg's of me couldn't budge it. I was sliding in the dirt. I eventually shimmied it up into position and after she stopped laughing, she put some bricks under it whilst I lifted it. I was buggered after this little episode so i left it for the night and came back to it the next morning.
I got the wheelbarrow and loaded a few bricks into it from the pallet of spares in the paddock. I put them in the bottom of the tub as a separator so the worms wont be in direct contact with the bottom of the tub.
The next step was to bring down the construction supplies. Lots of people use coconut husk for lining but I didn't want to spend the money so I used cardboard. I also purchased a roll of synthetic grass underlay, 1.5m of hessian and a couple of bags of compost, along with the worms (red wigglers). They recommend about 1000 worms to start with, but 500 was cheaper and they multiply fairly quickly.
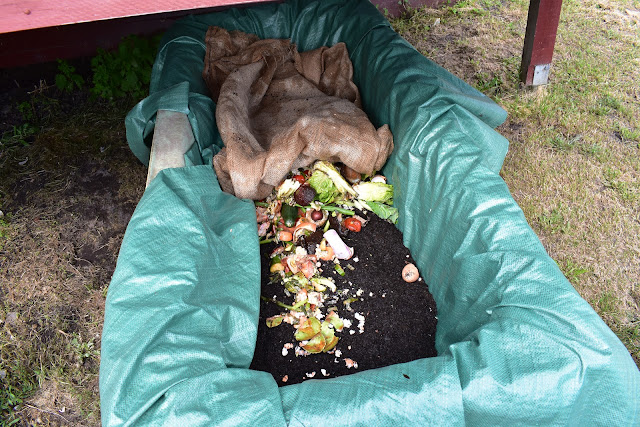
So the next step was to put the two layers of underlay lining on top of the bricks and tear some cardboard up as the base for the worms. I just used some old boxes and a few toilet rolls. The lining lets liquid seep through but wont allow the worms to escape. Time will tell how quickly it deteriorates. Some people use old trampoline fabric but you make the most of what you've got and this was only $10 or so.
The next step was to spread a layer of organic compost on top of the cardboard. I had planned to use two bags, but one was plenty. It gives the worms a nice environment to hide in. They hate the light so they will retreat deep into the compost when ever the lid is lifted off. The compost was $4 a bag. Sometimes you can get it really cheap. Just be ready to buy in bulk. I gave the compost a quick splash of water to dampen it down.
I then opened up my box of worms. They come in a plastic bag filled with what looks like horse poo. It's in large clumps so the worms weren't immediately visible until i broke the clumps up and spread them around a little. I couldn't tell how many there were in there but they were still alive after 2 days on the porch so I was happy.
Next, tipped a big tub of food scraps onto the compost, adjacent to the pile of worms. I had to pick out some onion scraps, worms don't like onion (apparently). I wet the hessian tarp and spread it over the top.
The final step was to place on the roof of my worm castle. I found a piece of plastic board in the shed. Its made of a similar material to those kitchen chopping boards. Thankfully it was a perfect fit so I placed it on top and put the compost bag on top of it to keep it there in case of any wind.
One thing that concerned me was the morning sun. I don't want my new pets to fry so I've put a few pieces of thin ply extending over the balcony to provide a bit more shade. I'm hoping the wet hessian and the lid are enough to block out the light. I have a feeling that the worms will migrate to the back of the tub, but the main thing is that it's built and ready to start making me some castings and worm juice for the garden. I've got a little plastic tub under the drain hole to collect the juice. If it doesn't work in it's current configuration, I can always tweak it.
Anyway, that's the worm bin done. Stay tuned for the next project!
Cheers,
Tom


Comments
Post a Comment